Docker has fundamentally changed how we develop and deploy software, supported by major cloud providers like AWS. If you've Dockerized your app and are facing complexities deploying it to either ECS (Elastic Container Service) or EKS (Elastic Kubernetes Service), consider an alternative approach: Running Docker Containers on AWS Lambda.
In this post, I'll show you how leveraging Lambda for Docker containers can simplify deployment and enhance dependency management, similar to Lambda's use of layers in CI/CD workflows.

Project Setup
We're going to work with a basic Python app for our example. It starts running when a new event happens, we will use the AWS console to trigger this event.
The app has two jobs. It takes any data from the event and stores it in a DynamoDB table with a unique ID. Once it's done, it sends back a message saying everything is OK (HTTP 200).
To talk to DynamoDB, we're going to use Boto3.
import os
import json
import uuid
import boto3

dynamodb =  boto3.resource("dynamodb")
database = dynamodb.Table("lambda-docker")

def handler(event, context):
    object_uuid = str(uuid.uuid4())
    body = {
        "uuid": object_uuid,
        "event": json.dumps(event),
    }

    database.put_item(Item=body)

    return {"statusCode": 200, "body": json.dumps(body)}
To make sure the Python app works correctly, we should also have a 'requirements.txt' file. This file will list all the necessary dependencies we need to install for the app.
boto3==1.26.86
Werkzeug==1.0.1
markupsafe==2.0.1
Before we delve into the Docker aspect, let's streamline our code deployment process. To do this, we'll create a new application using the Serverless Framework.
I won't go into the steps required to set up a Serverless account or how to link it to AWS, but you can follow their official guide: https://www.serverless.com/framework/docs/getting-started
Once you've successfully set up your Serverless account, you can create a new app by executing the following command:
npm i -g serverless && serverless \
    --org=yourorgname\
    --app=aws-lambda-docker \
    --name=aws-lambda-docker \
    --template=aws-python
Now, it's time to provision some resources in AWS. We need to create a DynamoDB table and two ECR (Elastic Container Registry) repositories. One repository will host our Docker function image, while the other will store the layer. For detailed instructions on how to create these resources, I recommend referring to the official AWS guides:
Once you've set up these resources, you'll need a 'serverless.yml' configuration file. This file grants your Serverless app the permissions needed to interact with both DynamoDB and ECR. You can use the configuration provided below.
org: yourorgname
app: aws-lambda-docker
service: aws-lambda-docker

frameworkVersion: '3'

provider:
  name: aws

  iam:
    role:
      statements:
        - Effect: "Allow"
          Action:
            - "ecr:InitiateLayerUpload"
            - "ecr:SetRepositoryPolicy"
            - "ecr:GetRepositoryPolicy"
					# Replace 'accountid' with your own account
          Resource: ["arn:aws:ecr:eu-west-1:accountid:repository/*"]
        - Effect: "Allow"
          Action:
            - "dynamodb:DescribeTable"
            - "dynamodb:Query"
            - "dynamodb:Scan"
            - "dynamodb:GetItem"
            - "dynamodb:PutItem"
            - "dynamodb:UpdateItem"
            - "dynamodb:DeleteItem"
					# Replace 'accountid' with your own account
          Resource: ["arn:aws:dynamodb:us-east-1:accountid:table/lambda-docker"]

functions:
  handler:
		# Replace with your function image repository url (grab it from ECR)
    image: accountid.dkr.ecr.us-east-1.amazonaws.com/lambda-docker-function-repository:latest
So, why do we need ECR? The reason is that we're instructing the framework to construct an image from a Docker function. This is made explicit in the last few lines of our setup. The Serverless Framework has built-in support for Lambda containers, making ECR an ideal place to store our Docker image and its layer.
functions:
  handler:
    image: accountid.dkr.ecr.us-east-1.amazonaws.com/lambda-docker-function-repository:latest
We've now completed the setup of our project. However, we're not ready to run it just yet because our repository is still empty. So, our next step is to populate it with an image.
Building our Docker Image and Layer
Now, consider boto3 as a library that we frequently bundle for our apps, as they all operate and interact with AWS services and infrastructure. How could we minimize redundancy and promote reusability by converting this dependency (and any others) into a reusable layer?
The answer lies in using Docker layers. Docker natively supports the concept of layers, enabling us to compartmentalize different parts of our application for easy replication and modification.
Therefore, we're going to proceed by creating two Dockerfiles.
layer.Dockerfile
We're going to construct the layer as a container image. Similar to how Lambda layers are attached to a .zip archive function, container layers are also added to other container images.
To maintain the same file path as Lambda layers, it's crucial that the respective files in the published container images are located in the /opt directory. This approach ensures consistency in file paths, helping the application run smoothly.
FROM python:3.8-alpine AS installer

# Copy requirements.txt
COPY requirements.txt /opt/

# Install layer dependencies
RUN pip install -r /opt/requirements.txt -t /opt/lib

FROM scratch AS base

# Each runtime looks for libraries location under /opt
WORKDIR /opt/

COPY --from=installer /opt/ .
In our example, the layer installs boto3 via pip install, guided by a requirements.txt file. This process is transitioned into the docker build workflow. To be able to run pip install during the build process, you need to add a Python runtime. A minimal base image like python:3.8-alpine would be suitable for this purpose.
Creating individual container images for each layer gives you the advantage of being able to add them to multiple functions and share them widely. This works in a similar manner to Lambda layers, enhancing the reusability of your code.
function.Dockerfile
The Dockerfile syntax used for packaging a function as a container image includes certain commands. These commands pull the container image versions of Lambda layers and subsequently copy them into the function image. The image containing the shared dependencies is sourced from the Elastic Container Registry (ECR), making the overall process more efficient.
# Replace 'accountid' with your own account
FROM accountid.dkr.ecr.us-east-1.amazonaws.com/lambda-docker-layer-repository:latest AS layer

# Use the existing AWS Python image for Lambda compatibility (https://docs.aws.amazon.com/lambda/latest/dg/python-image.html)
FROM public.ecr.aws/lambda/python:3.8

# Layer code
WORKDIR /opt

COPY --from=layer /opt/ .

ARG FUNCTION_DIR="/var/task"

# Create function directory
RUN mkdir -p ${FUNCTION_DIR}

WORKDIR ${FUNCTION_DIR}

# Copy handler function and requirements.txt
COPY app.py .

# Set the CMD to your handler
CMD [ "app.handler" ]
The Dockerfile dedicated to the function comprises commands that pull files from the layer image we previously created, incorporating them into the function image. Notably, there's no requirement for a pip install command in the function, as it doesn't demand any additional dependencies beyond what's already provided in the layer.
Deploying the Code with GitHub Actions
In an effort to maintain simplicity and bypass the need for manual image uploads to ECR, we'll leverage GitHub Actions to establish our CI/CD pipeline. This will automate our deployment process, reducing the risk of errors.
Much like with Docker, we'll create two YML files, which will reside in the .github/workflows directory. Both of these workflows will adhere to GitHub's official guide for Amazon Elastic Container Service (ECS).
layer.yml
To put it simply, the GitHub action for the layer will only be triggered when our dependencies change (as reflected in the requirements.txt file). This is crucial because if we wish to upgrade Boto3, modify a dependency, or add a new library, we'd want the layer to be rebuilt. This ensures that our application has the most recent code for these dependencies.
However, there's another advantage: saving valuable deployment time. If we've only altered our code but not the dependencies, there's no need to spend time rebuilding the layer. In such cases, the most recent layer in the ECR repository would suffice, making the deployment process faster.
name: Deploy Lambda Docker Layer to ECR

on:
  push:
    branches:
      - main
    paths:
      - requirements.txt

  workflow_dispatch:

env:
  ECR_REPOSITORY: lambda-docker-layer-repository
permissions:
  contents: read

jobs:
  deploy:
    name: Build Lambda Layer Image
    runs-on: ubuntu-latest
    environment: production

    steps:
      - name: Checkout
        uses: actions/checkout@v3

      - name: Configure AWS credentials
        uses: aws-actions/configure-aws-credentials@v1
        with:
          aws-access-key-id: ${{ secrets.AWS_ACCESS_KEY_ID }}
          aws-secret-access-key: ${{ secrets.AWS_SECRET_ACCESS_KEY }}
          aws-region: ${{ secrets.AWS_REGION }}

      - name: Login to Amazon ECR
        id: login-ecr
        uses: aws-actions/amazon-ecr-login@v1

      - name: Build, tag, and push image to Amazon ECR
        id: build-image
        env:
          ECR_REGISTRY: ${{ steps.login-ecr.outputs.registry }}
          IMAGE_TAG: latest
        run: |
          docker build --platform linux/amd64 -f layer.Dockerfile -t $ECR_REGISTRY/$ECR_REPOSITORY:$IMAGE_TAG .
          docker push $ECR_REGISTRY/$ECR_REPOSITORY:$IMAGE_TAG
          echo "::set-output name=image::$ECR_REGISTRY/$ECR_REPOSITORY:$IMAGE_TAG"
Take note that before we can utilize these pipelines, we need to establish a few environment variables. Here's the list you'll need to set up: AWS_ACCESS_KEY_ID, AWS_SECRET_ACCESS_KEY , AWS_REGION, ECR_REGISTRY and ECR_REPOSITORY.
When it comes to AWS credentials, you have a couple of options. You can use the same set of credentials you established for Serverless, or you can create a new set of credentials dedicated solely to CI/CD operations. The choice depends on your specific needs and preferences.
function.yaml
Much like the layer action, the function action gets triggered by two specific events. The first is any push to the main branch that contains changes to our app code. The second is when the layer action finishes deploying.
The latter is particularly important due to the way Docker layers operate. If you've updated your layer, you'll want your app code to be rebuilt with the latest layer. This ensures that the application code has access to the new or updated dependencies.
name: Deploy Lambda Docker Function to AWS

on:
  workflow_run:
    workflows: ["Deploy Lambda Docker Layer to ECR"]
    types:
      - completed
  push:
    branches:
      - main
    paths:
      - app.py # or a folder containing the function code

  workflow_dispatch:

env:
  ECR_REPOSITORY: lambda-docker-function-repository

permissions:
  contents: read

jobs:
  deploy:
    name: Build Lambda Function Image
    runs-on: ubuntu-latest
    strategy:
      matrix:
        node-version: [16.x]
    steps:
      - name: Checkout
        uses: actions/checkout@v3

      - name: Configure AWS credentials
        uses: aws-actions/configure-aws-credentials@v1
        with:
          aws-access-key-id: ${{ secrets.AWS_ACCESS_KEY_ID }}
          aws-secret-access-key: ${{ secrets.AWS_SECRET_ACCESS_KEY }}
          aws-region: ${{ secrets.AWS_REGION }}

      - name: Login to Amazon ECR
        id: login-ecr
        uses: aws-actions/amazon-ecr-login@v1

      - name: Build, tag, and push image to Amazon ECR
        id: build-image
        env:
          ECR_REGISTRY: ${{ steps.login-ecr.outputs.registry }}
          IMAGE_TAG: latest
        run: |
          docker build --platform linux/amd64 -f function.Dockerfile -t $ECR_REGISTRY/$ECR_REPOSITORY:$IMAGE_TAG .
          docker push $ECR_REGISTRY/$ECR_REPOSITORY:$IMAGE_TAG
          echo "::set-output name=image::$ECR_REGISTRY/$ECR_REPOSITORY:$IMAGE_TAG"

      - name: Use Node.js ${{ matrix.node-version }}
        uses: actions/setup-node@v3
        with:
          node-version: ${{ matrix.node-version }}

      - run: npm ci

      - name: Serverless Deploy
        uses: serverless/github-action@v3
        with:
          args: deploy
        env:
          SERVERLESS_ACCESS_KEY: ${{ secrets.SERVERLESS_ACCESS_KEY }}
          AWS_ACCESS_KEY_ID: ${{ secrets.AWS_ACCESS_KEY_ID }}
          AWS_SECRET_ACCESS_KEY: ${{ secrets.AWS_SECRET_ACCESS_KEY }}
The function pipeline carries another crucial responsibility: it deploys our function to AWS Lambda! Thanks to the Serverless Framework, this task is incredibly straightforward. All we need to do is install NodeJS and run npm ci to bring in the necessary Serverless dependencies. Once the dependencies are installed, the deployment is as simple as executing the serverless deploy command within the official GitHub action.
This action will read our serverless.yml configuration file and push the updated code to our AWS account, effectively deploying our app on AWS Lambda.
Testing Out Everything
Here are the steps to follow to test our setup:
- Trigger the Layer action from GitHub. Once completed, it should automatically initiate the Function action.
- After both actions have finished, log into your AWS account and navigate to AWS Lambda.
- You'll find a new function with the name you specified. Open it and go to the 'Test' section.
- Emit an event using the default payload.
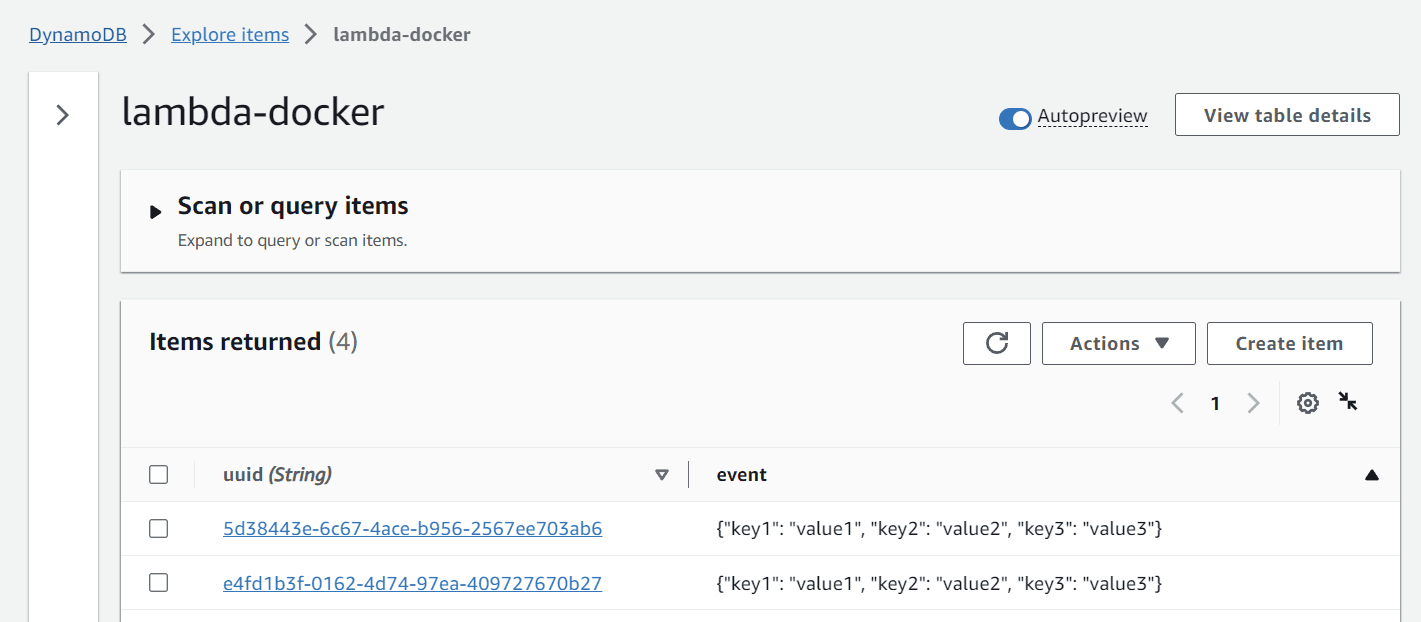
- Next, switch to DynamoDB and open the table you created earlier.
- Query the table, and you should see the entry you just made.

Now, let's experiment with the actions:
- Add a
printstatement to theapp.pyfunction and commit it to the main branch. Observe how it only triggers the Function pipeline. - Finally, upgrade boto3 to version 1.26.87 and commit the change. Notice how it triggers the Layer pipeline first and then subsequently activates the Function pipeline.
This shows you the flexibility and efficiency of our setup in action, demonstrating how changes can be propagated quickly and effectively!
Closing Comments
I hope this guide has been helpful in showing you how to combine Docker and serverless technologies. If anything is still unclear, feel free to drop me an email. Looking forward to sharing more in the future!