In this post, I’ll show you how to deploy a multiplayer game to the cloud. Feel free to jump to the hands-on section if you want to skip the theory and understand why I'm writing this post. Otherwise, feel free to continue reading from here!
Understanding Dedicated Game Servers
When I started working on games, one of the toughest concepts for me as a backend engineer was dedicated game servers. The confusion came because gameplay engineers often used "the server" to mean dedicated game servers, which was different from how I'd always understood "the server" in my developer career, where it referred exclusively to the backend.
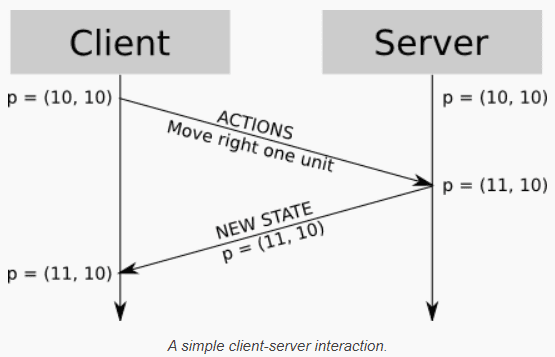
However, in game development, these terms have distinct meanings. The backend serves as the platform that runs various social and online services to support a game's multiplayer capabilities, such as authentication, account management, leaderboards, matchmaking, and more. In contrast, a dedicated game server functions as the authoritative source of game state. Clients send their actions to the server, which updates the game state periodically and sends the latest state back to clients for rendering on the screen.
When you begin developing a new multiplayer game as a backend engineer, you're often responsible for orchestrating these dedicated servers. Services like matchmaking rely on interacting with these servers to host game matches. Essentially, these dedicated servers are headless processes written in either the same engine as the gameplay side of the game or in a separate language like Go or Node.js. These servers are designed to handle multiple concurrent player connections efficiently.
But more challenging than understanding the concept is putting it into practice. How can you learn all of this? That's precisely what I aim to cover in this post, keeping it as beginner-friendly as possible for you.
Game Server Hosting Solutions
When you Google game server hosting solutions, you'll come across companies that employ any of the three approaches below.
Build Your Own OrchestratorSome game studios opt to create their own game server orchestrator using either their own hardware with cloud management software like OpenStack or leveraging base compute services from major cloud providers such as EC2 in AWS or GCE in Google Cloud. This orchestrator acts as middleware responsible for allocating compute resources (CPU and memory) to scale either vertically or horizontally to manage the game server fleet.
This approach is commonly seen with AAA games, a term informally used to classify video games with higher development and marketing budgets compared to other tiers of games.
Use a Third Party ServiceThe approach that felt most familiar to me, coming from the web industry where you typically pay for dedicated compute power either on-demand or upfront and receive a fully managed service in return, also applies in the game industry for game server hosting.
There are several options available where you can easily run your game servers. By interacting with an API, you can upload your game server builds, allocate resources, and spin up game server instances as needed. Additionally, these services provide an admin dashboard that allows you to manage everything through a user-friendly interface.
Names like Multiplay, i3D.net, Edge Gap, Hathora, and Amazon GameLift are notable in this space. While my experience primarily relates to these services, I won't delve into specific recommendations in this post. But I encourage you to explore them yourself, as each offers different levels of optimization, pricing, scalability, and developer experience.
Pickup an Open Source Alternative (This Tutorial)We all appreciate Open Source for its accessibility (no entry fees to get started) and the opportunity to contribute to projects we find interesting or enjoy, often supported by vibrant communities.
In the game development realm, one standout open source tool is particularly noteworthy: Agones. It's not only popular among the community but also battle-tested. Agones is described as "a dedicated game server scaling and orchestration platform that runs on Kubernetes." In this post, I'll demonstrate how you can harness Agones to host your multiplayer game.

🎮 Hands On!
Requirements
Now, let's dive in! Before we can use Agones to run our game, we need a game to work with. Since we're embracing open source, we'll use Godot for our game development. I'll be using a straightforward game created by FinePointCGI (https://www.youtube.com/@FinePointCGI), who, in my opinion, is one of the top content creators for Godot and multiplayer games out there.
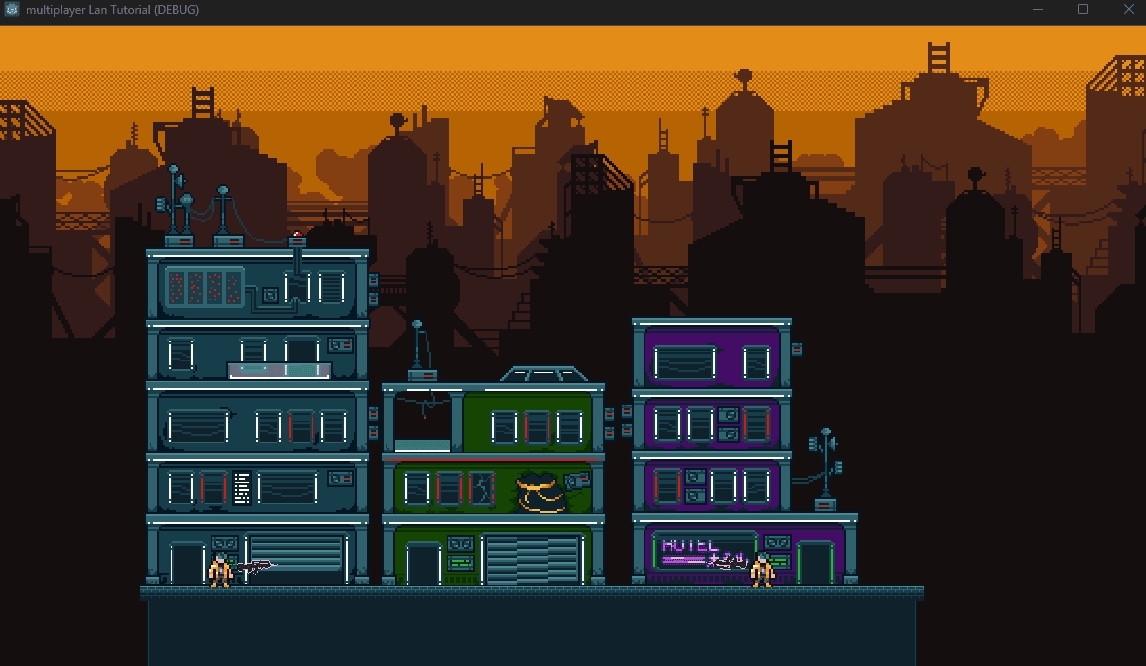
It is indeed a simple multiplayer game for two players as you can see The focus here is on hosting, so we won't go into much detail about gameplay. Once connected, each player can control one character and fire their gun, with actions synchronized across both players' screens.
I've forked the project and made a small change: instead of one player serving as the dedicated server, both players now connect to a remote server running on Agones.
You can find the repository here: github.com/andresromerodev/godot-agones-multiplayer. Feel free to download and run it using Godot!
If you're using a single computer, you'll need to run two game clients simultaneously. To do this, launch the project and navigate to Debug → Run Multiple Instances → Run 2 instances.
As mentioned, I won't cover the entire gameplay and networking aspects here. If you're interested in learning more about these topics, I recommend watching this video tutorial: youtube.com/watch/e0JLO_5UgQo. Coding in Godot is often considered easier compared to some other game engines.
However, there are three sections of the code related to Agones that I want to explain. When dealing with game server hosting, it's crucial to monitor running instances, their details such as IP and port, their health status, and readiness to accept player connections, among other functionalities. Agones achieves this through an SDK. For this example, we'll use the Agones Community SDK for Godot, which you can find here: github.com/AndreMicheletti/godot-agones-sdk.
Setting up the SDK is straightforward, and for our use case, we'll need to call three functions: start(), ready(), and health().
Starting the Agones SDK
To ensure the SDK is initialized early enough, you should start it as soon as possible. The ideal place for this is in the _ready() function of Godot, which is called at the beginning of the game server process. This ensures that the SDK is ready to handle any subsequent SDK function calls effectively.
func _ready():
    AgonesSDK.start()
	if "--server" in OS.get_cmdline_args():
		hostGame()
Report the Game Server as Ready
Once the SDK is initialized and you've completed other initialization steps for your game, the final step should be to report your game server as "ready". This action informs Agones that players can now connect to the match. To accomplish this, I've created a hostGame() function within the MultiplayerController.gd script. This function will notify Agones that the server is ready once it starts listening on the designated port.
func hostGame():
	peer = ENetMultiplayerPeer.new()
	var error = peer.create_server(server_port, 2)

	if error != OK:
		print("cannot host: " + error)
		return

	peer.get_host().compress(ENetConnection.COMPRESS_ZLIB)
	multiplayer.set_multiplayer_peer(peer)

	AgonesSDK.ready()

	print("Reported game server as ready to Agones...")
	print("Waiting For Players!")
Report the Game Server as Healthy
To effectively manage game servers at scale, it's crucial for each instance to regularly report its health status. The health() function provided by the Agones SDK is used for this purpose. Since reporting health should be continuous, the best approach is to implement this within the _process() function in Godot. This function is called every frame, ensuring that health status updates are frequent and timely.
var elapsed_time = 0.0  # Variable to track the elapsed time

# Called every frame. 'delta' is the elapsed time since the previous frame.
func _process(delta):
	if peer:
		elapsed_time += delta  # Increment the elapsed time by the time since the last frame

		if elapsed_time >= 60.0:  # Check if 60 seconds have passed
			AgonesSDK.health()
			elapsed_time = 0.0
Great! Now let's delve into Agones and Kubernetes!
Running Agones
As I’m aiming to keep this post as simple as possible, I’m going to choose Digital Ocean as our infrastructure provider. They offer a fully managed Kubernetes service, which makes it straightforward to spin up new clusters and nodes.
Before we dive deeper, if you’re new to Kubernetes, I recommend reading this guide. It explains Kubernetes in a simple manner and should give you a basic understanding of what we'll be doing.
So, let’s set up a cluster in Digital Ocean. Feel free to sign up; they provide $200 in entry credit for new members, which should be sufficient for our tests.
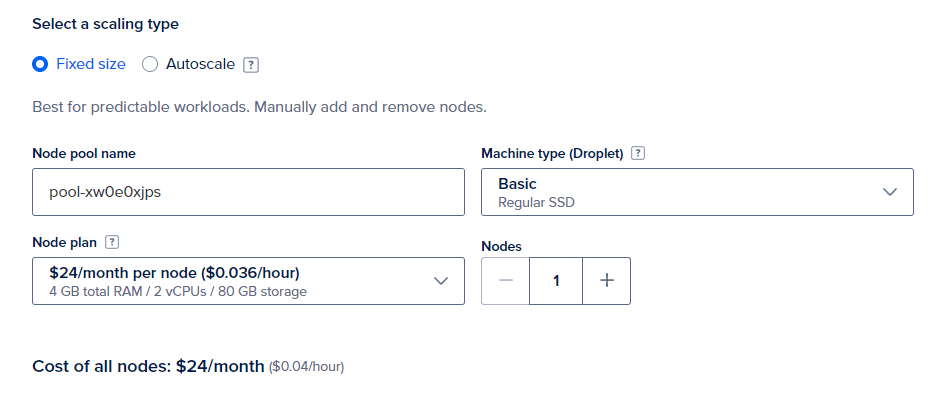
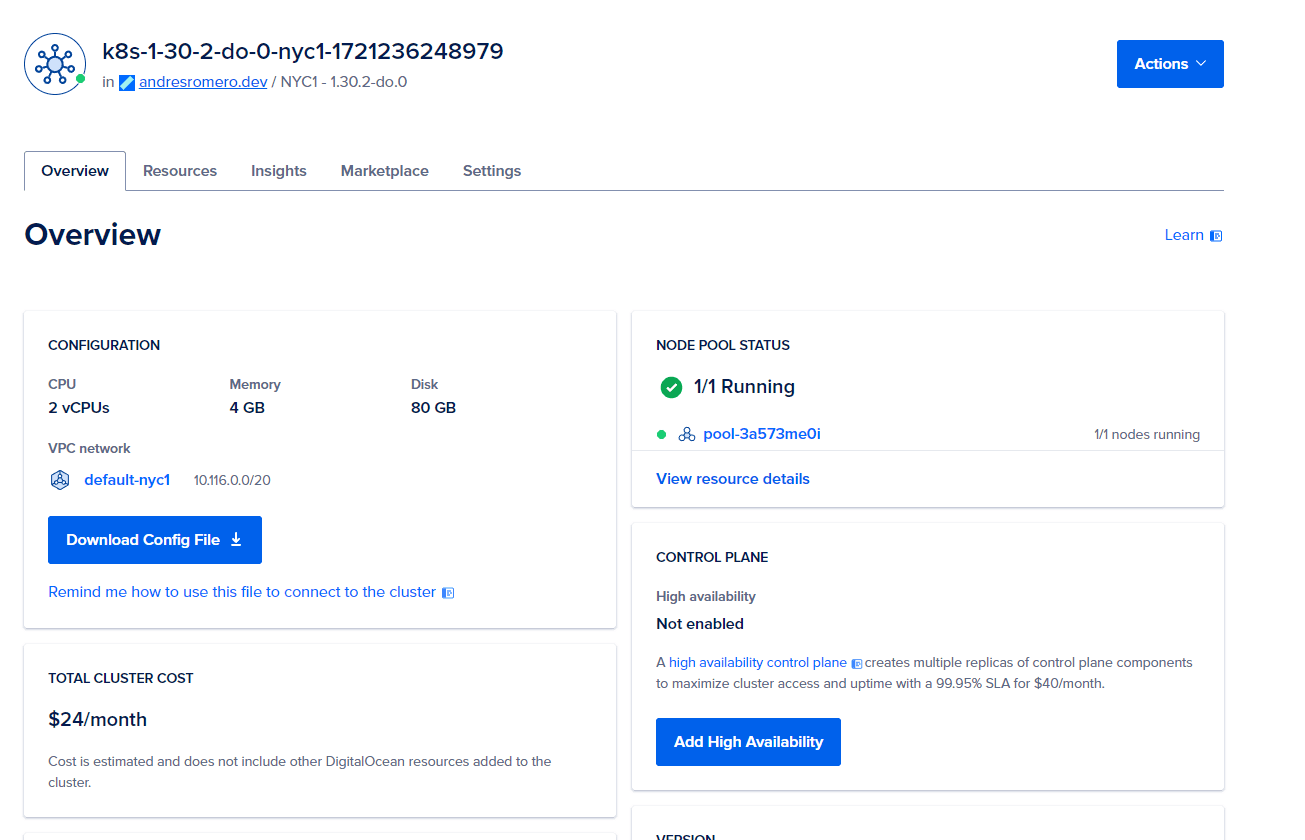
- Navigate to the Kubernetes section and click on “Create.” You’ll be prompted to enter various configurations for your cluster. Most defaults should work fine, but ensure your instance is configured with at least 4GB of RAM and 2 vCPUs. For this example, one node should suffice.
- Once your cluster is fully provisioned, it will take between 2 to 4 minutes to start. Once it's ready, you'll see it running and available for use.
-
Click on "Actions" ➜ "Download Config" in your Digital Ocean Kubernetes dashboard. Name the downloaded file whatever you prefer (e.g.,
digital-ocean.yaml) and save it in a folder that you'll remember for future reference. -
Open a terminal and set the
KUBECONFIGenvironment variable to point to the path where you downloaded the kubeconfig file.
# Windows
set KUBECONFIG "C:\path\to\your\kubeconfig.yaml"
# Linux/MacOS
export KUBECONFIG=/path/to/your/kubeconfig.yaml- After setting the
KUBECONFIGenvironment variable, you should relaunch your terminal for the changes to take effect. Once you've relaunched, you can run the following command to ensure you're connected to the cluster:
$ kubectl get nodes
NAME                   STATUS   ROLES    AGE   VERSION
pool-3a573me0i-bnc3y   Ready    <none>   63m   v1.30.2
- Let's install Agones using Helm.
helm repo add agones https://agones.dev/chart/stable
helm repo update
helm install agones-release --namespace agones-system --create-namespace agones/agones- You'll see the Agones services come up. Wait until they are all ready.
andre@xps MINGW64 ~
$ kubectl get pods -A
NAMESPACE       NAME                                 READY   STATUS    RESTARTS   AGE
agones-system   agones-allocator-75cb8cbc79-6jw7c    1/1     Running   0          1m
agones-system   agones-controller-69bd4676f7-cmrrd   1/1     Running   0          1m
agones-system   agones-extensions-666d6f4666-pd4hc   1/1     Running   0          1m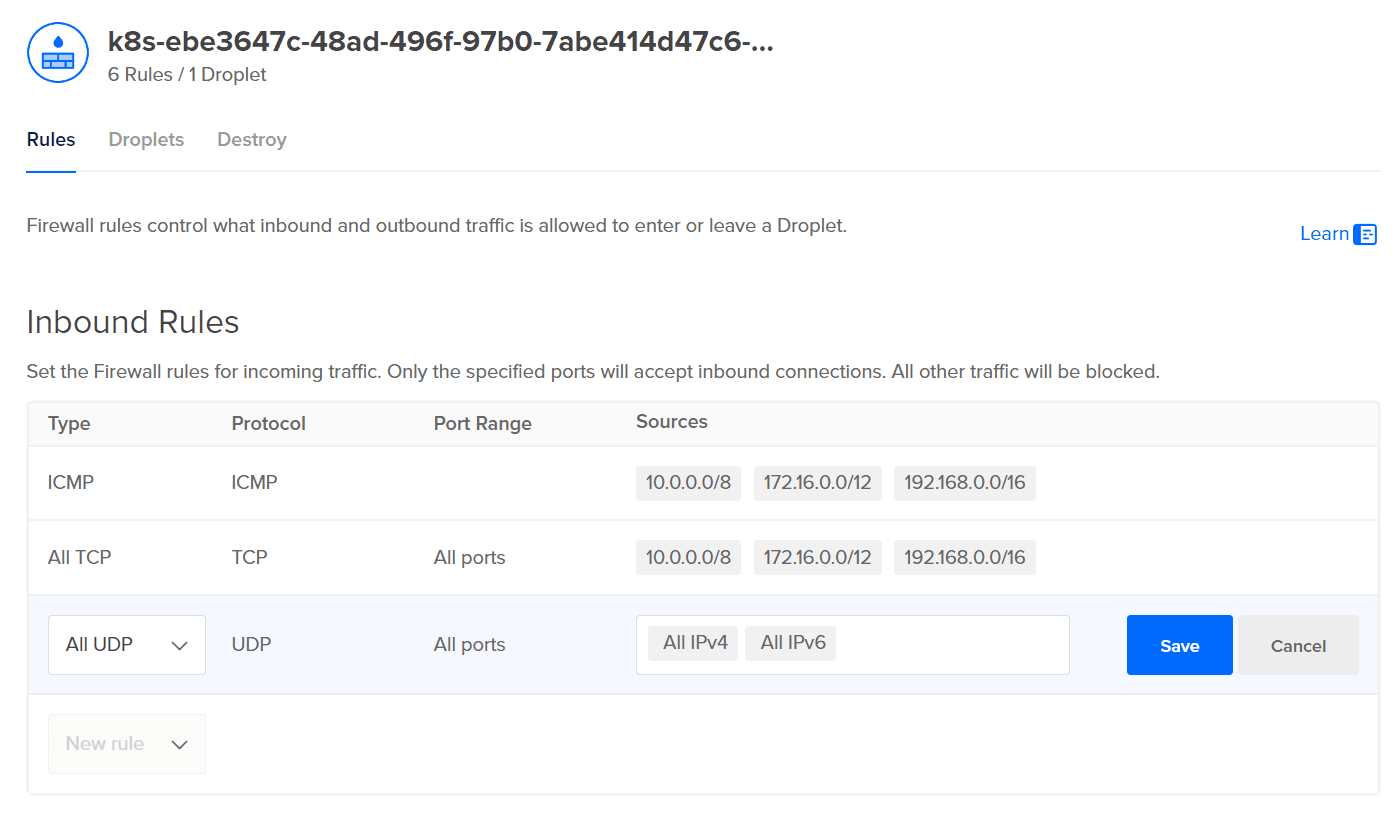
agones-system agones-ping-7786b574cd-68q6c 1/1 Running 0 1m- Last but not least, you need to open the cluster firewall in Digital Ocean to allow UDP connections to your game servers. To do that, go to Networking → Firewalls → Select the appropriate non-public firewall. You should see an “Inbound Rules” section; add a new “All UDP” rule and ensure it allows all IPv4 and IPv6 clients. This allows players from around the world to connect to your servers if necessary.
And that should be all; our cluster is fully set up and running Agones. Wasn’t that difficult, right?
Building the Game Server
Okay, we have our game and our cluster set up for hosting. But how do we run the game on the cluster? Since we are using Kubernetes, we'll package our game servers as Docker images.
I've included a Docker image in the repo that uses CentOS as a base image.
FROM centos:latest
WORKDIR /etc/yum.repos.d/

# Update repository URLs
RUN sed -i 's/mirrorlist/#mirrorlist/g' CentOS-* && sed -i 's|#baseurl=http://mirror.centos.org|baseurl=http://vault.centos.org|g' CentOS-*

# Install necessary packages
RUN dnf install -y curl unzip libXcursor openssl openssl-libs libXinerama libXrandr-devel libXi alsa-lib pulseaudio-libs mesa-libGL && dnf clean all

# Set Godot version as an environment variable
ENV GODOT_VERSION="4.2.2"

# Download Godot from GitHub
RUN curl -LO https://github.com/godotengine/godot/releases/download/${GODOT_VERSION}-stable/Godot_v${GODOT_VERSION}-stable_linux.x86_64.zip

# Unzip and move the Godot binary to the appropriate directory
RUN unzip Godot_v${GODOT_VERSION}-stable_linux.x86_64.zip
RUN mv Godot_v${GODOT_VERSION}-stable_linux.x86_64 /usr/local/bin/godot

# Make the Godot binary executable
RUN chmod +x /usr/local/bin/godot

# Clean up the zip file
RUN rm Godot_v${GODOT_VERSION}-stable_linux.x86_64.zip

# Update system and install ca-certificates
RUN dnf -y update && dnf -y install ca-certificates && update-ca-trust && dnf clean all

EXPOSE 8910

COPY game.pck .

CMD ["/usr/local/bin/godot", "--headless", "--main-pack", "./game.pck", "--server"]
It installs Godot and runs a game.pckc; this file is the dedicated game server. I'm including the .pckc in the repo. I admit that the Docker file could be improved so that the .pckc is generated as part of the Docker build process, eliminating the need for manual action. However, if you want to make modifications to the project, feel free to modify the code and rebuild the dedicated server from Godot → Project → Export → Linux → Export PCK/ZIP.
Once you have the updated .pckc, you can build the Docker image with:
docker build --pull --rm -f "dockerfile" -t godotagonesmultiplayer:latest "." Creating a Public Registry and Submitting the Server Image
Now, to use our image, we need to store it somewhere. To keep things simple, we're going to create a public Docker registry. You can sign up for an account on Docker Hub. I've named my repo godotagonesmultiplayer, and you can find it at hub.docker.com/godotagonesmultiplayer.
For the purposes of this tutorial, we'll tag the image as "latest" and then upload it to our registry. You can do this by running the command below:
docker image push docker.io/YOURUSERNAME/godotagonesmultiplayer:latest How to Start a Game Server
At this point, you should have the main two pieces: 1) Agones and 2) an image for your game server. Now, we need to instruct Agones on how to run the game server image. For this, we are going to create a Kubernetes manifest file. I've named mine gameserver.yaml. This manifest file tells Agones how the game server should run, specifying details such as CPU, memory, ports, and even rules for health checking.
apiVersion: agones.dev/v1
kind: GameServer
metadata:
  generateName: multiplayer-game-server-
spec:
  ports:
    - name: default
      portPolicy: Dynamic
      containerPort: 8910
  health:
    # Disable health checking. defaults to false, but can be set to true
    disabled: false
    # Number of seconds after the container has started before health check is initiated. Defaults to 5 seconds
    initialDelaySeconds: 30
    # If the Health() function does not get called at least once every period (seconds), then
    # the game server is not healthy. Defaults to 5
    periodSeconds: 120
    # Minimum consecutive failures for the health probe to be considered failed after having succeeded.
    # Defaults to 3. Minimum value is 1
    failureThreshold: 10
  template:
    spec:
      containers:
        - name: multiplayer-game-server
          image: docker.io/andresromerodev/godotagonesmultiplayer:latest  # Use the latest version of the multiplayer game server image
          imagePullPolicy: Always
          resources:
            requests:
              cpu: "1"       # Request up to 1 CPU core1
              memory: "1Gi"  # Request up to 1 GB memory
            limits:
              cpu: "4"       # Limit to 4 CPU cores
              memory: "8Gi"  # Limit to 8 GB memory
These are just some of the things you can configure. For more advanced use cases, I recommend checking out the Agones official docs at https://agones.dev/site. The goal of this tutorial is to help you deploy your first game server without delving too deep into Agones' advanced concepts, but I encourage you to learn more as you complete this tutorial.
Now, let's run a game server. Open the terminal and run:
kubectl create -f https://raw.githubusercontent.com/YOURUSERNAME/godot-agones-multiplayer/main/gameserver.yaml
Verify that the server has started and is running:
kubectl get gameservers
NAME                            STATE   ADDRESS          PORT   NODE                   AGE
multiplayer-game-server-gg79v   Ready   68.183.121.179   7459   pool-3a573me0i-bnc3y   16s
If you're curious, you can check the server logs. You should see two API calls from the server to Agones: the "report ready" call and the health call to indicate the server is healthy. The health call will repeat every 60 seconds to keep the server running.
kubectl logs multiplayer-game-server-gg79v -c multiplayer-game-server

Godot Engine v4.2.2.stable.official.15073afe3 - https://godotengine.org
[AGONES] SDK STARTING UP... PORT FOUND: 9358
[AGONES] POST /ready
Reported game server as ready to Agones...
Waiting For Players!
[AGONES] REQUESTED COMPLETED. RESPONSE_CODE: 200 | CODE: 0
[AGONES] POST /health
Time to Play! Connecting to the Server
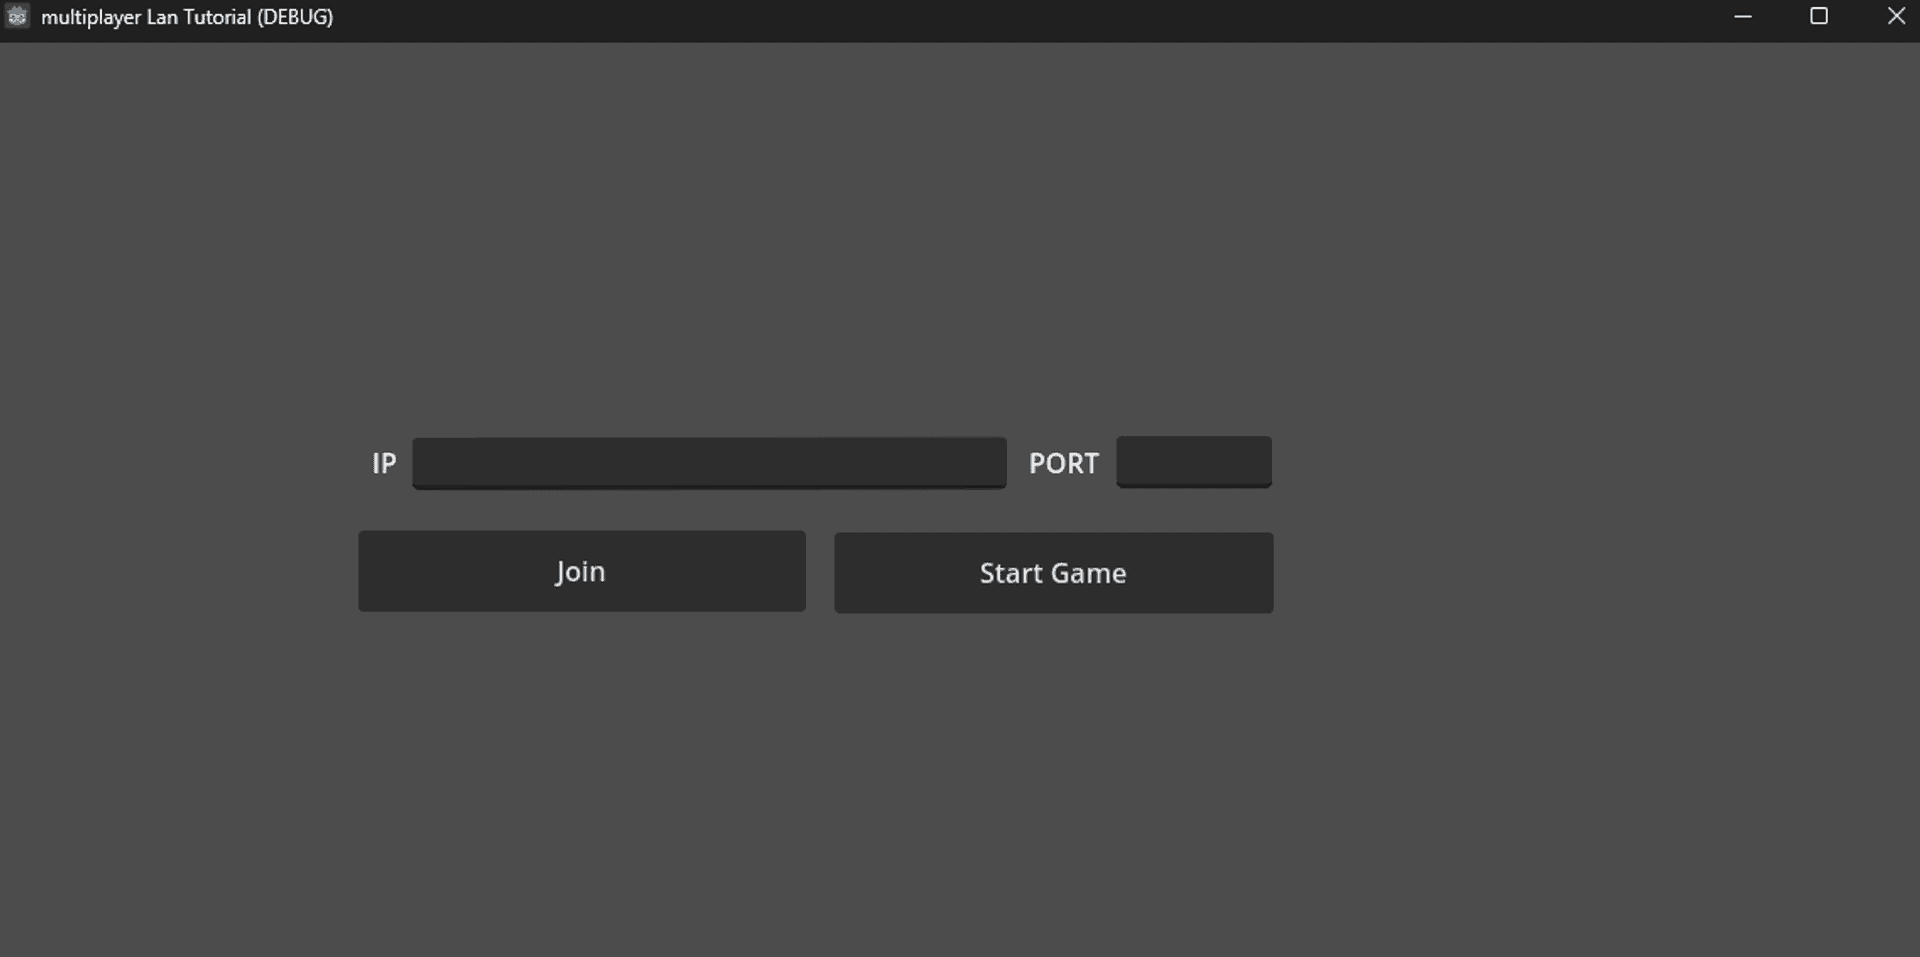
Finally, let’s connect and play! If you haven't already, you run 2 instances of the game using Godot. Alternatively, you can generate a client build for Windows, Mac, or Linux using the same Export process we used for the game server. Once the clients are launched, you'll want to enter the IP and Port displayed after running kubectl get gameservers.
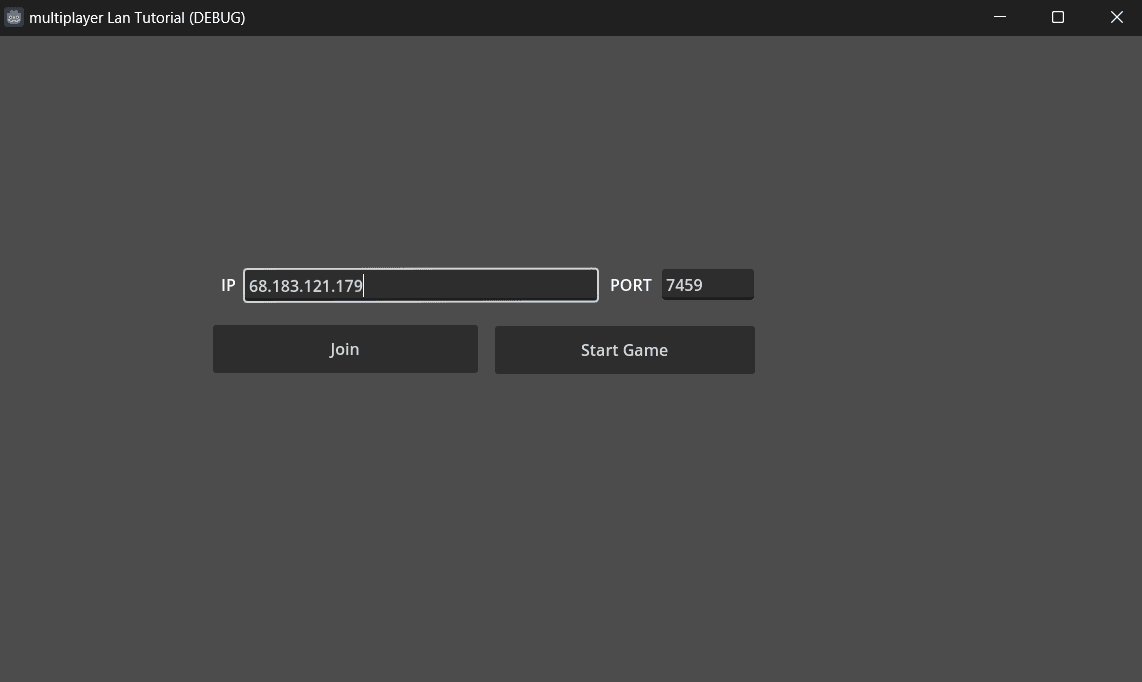
Click "Join" for both players. You should see new logs in the server:
kubectl logs multiplayer-game-server-gg79v -c multiplayer-game-server
Player Connected 67851921
Player Connected 231925406
Now, pick one of the two clients as the leader and click on 'Start Game,' and voilà! You can start playing! :)

Not the best game I know, and you probably noticed there is no win condition other than falling off the platform, lol. But the idea is to help you understand the concepts around dedicated game servers rather than focusing on gameplay.
Closing Comments
I know Kubernetes can be a challenging topic, especially for beginners. It might have caused you a headache, or maybe you've become even more curious and want to keep learning! Either way, feel free to reach out with questions, I'm just one ping away from you on LinkedIn or Twitter (X), and all DMs are welcome! I hope you enjoyed it.
Thanks for reading!